Grain Storage Options For All Uses

There are so many grain storage options at your disposal that choosing the right one can become an overwhelming decision. There are a lot of factors to consider such as price, vessel, temperature, and moisture. To keep from overwhelming yourself, weigh each consideration individually so that the information is easier to process.

We’ll break this down and provide you with some detailed information about the grain storage options available so you can make an informed decision.

Grain Storage Options

Important Considerations When Storing Grain

Avoid damage to grain by factoring in these important considerations when choosing the right storage.

1. Grain Temperature

When grain reaches a high enough temperature, it will sweat. This sweat leads to fungus and mold, making the grain toxic. Be sure to take temperature into consideration when choosing the right grain storage. Proper aeration is essential to maintaining its temperature so the storage must have adequate air flow. The amount of air flow depends on climate and the length of storage.

Proper aeration prevents sweating, which in turn eliminates all of the other detrimental factors mentioned above.

2. Moisture in Grain Storage

Moisture is conducive to the growth of fungus and mold. It also attracts pests. All of these are detrimental to the health of the grain. As we mentioned earlier, sweating is a big problem with grain but water can also find its way into grain storage areas and wreak havoc.

Grain should be checked regularly to make sure that the moisture level is right. So storage areas must provide access for grain testing.

Grain Storage Options

Each modern method of grain storage has its own advantages. Which one you choose will greatly depend on the amount of grain you need to store and how long you plan to store it.

1. Grain Silo

Grain silos are the most commonly known method of storing grain. They are great for farmers who need to store a high volume. They are also perfect for long-term storage as long as the proper care is taken. But as you might imagine, they are quite expensive.

Furthermore, silos are not a great long-term storage option for grains with high moisture. These types of grains stick to the sides of the silo and will struggle to funnel down into the augers that carry them out of the silo. Other options should be considered when dealing with high moisture grains.

You also need the right equipment to load grain into silos so that’s another consideration.

For smaller scale operations, small grain bins, usually crafted of steel are worth consideration. They are designed as hopper bottom bins and have a slide gate at the bottom of the bin.

Safety is another concern with silos since they come with several risks that must be mitigated. Grain dust is the biggest safety concern with large-scale grain silos. Dust is flammable and can lead to explosions. It can also cause respiratory problems.

2. Grain Storage Bags

Grain storage bags (also called silo bags) are a great option for storing grain. They work just as the name implies. They are bags that store specific amounts of grain. What makes this grain storage option so beneficial is its cost and versatility. Grain storage bags are a great option for small farmers who only grow limited amounts of grain.

This option is also a great way to separate different grain types and works well for transporting small amounts of grain. For instance, if you plan to take your grain to the market within a month of harvest, then this might be your best option.

Just remember that silo bags are a short-term solution. Storing grain for longer than a few months will severely affect its quality.  When storing grain in bags, perform regular inspections to make sure pests have not infested it.

3. Grain Shed

This is the method of grain storage that most farmers use. The biggest benefit of using a grain shed for storage is convenience. Grain is driven straight to the shed when harvested. As you might imagine, this is not only convenient but since the grain requires less handling, manual labor costs are significantly reduced.

Grain sheds are large open spaces where you store grain. This space is generally used to store farm equipment during the off-season. Plus their open layout naturally reduces many of the safety hazards associated with storing grain.

ways to store gains

In fact, enclosed grain sheds can protect grain for a long period of time without the costs associated with grain silos. The only downside is that the amount of grain you’re able to store is limited to the size of the shed.

Final Thoughts

Ultimately, the grain storage option you choose depends on a lot of different factors. There’s not a one-size-fits-all approach. Silos are the most expensive option and only useful if you harvest too much grain for a grain shed to hold. Grain storage bags are only used for short-term storage. So a grain shed is the option most farmers go with due to its versatility.

With that said, do your homework before making this important decision.

IMS PCB: Everything You Need to Know

The metal substrate of IMS PCBs improves mechanical and thermal conductivity. Copper and aluminum are common materials used because they are both inexpensive and light. Copper is more suitable for high-density designs, but it has a lower CTE. A single electrical layer must be sandwiched between a metallic substrate and a prepreg layer in the Integrated Metal Substrate PCB design layout. Typically, these boards are used for simple circuits.

applications of IMS boards

IMS PCBs are suitable for a wide range of applications, including high-power, flammable, and high-temperature environments. They can serve as ground layers to protect sensitive electronic components and directly absorb heat produced by SMD components. These boards are particularly useful in the fields of LEDs, solid-state relays, and power electronics. They do, however, provide additional benefits. If you’re not sure whether IMS PCBs are the right choice for your next project, keep reading to learn more about IMS PCBs and how they can help you make your next project.

IMS PCBs is used in automotive applications because they aid in the cooling of surface-mount components. The dimensional stability of the IMS PCB allows it to operate without cracking in temperatures ranging from 140 to 150 degrees Celsius. Furthermore, its thickness does not increase significantly with temperature, and it can withstand high temperatures. IMS PCBs is frequently more expensive than FR4 PCBs, so choose PCB May if you need high-quality IMS PCBs.

To help manage heat, an IMS PCB has a copper-based base material and a copper-based layer. This layer is made of a copper-based alloy and is either 1.0mm or 1.6mm thick. A single-sided IMS PCB is clear, whereas a double-sided IMS PCB has an aluminum layer on the board’s outside. The IMS PCB is a multilayer PCB regardless of the materials used.

Thermal vias can be counterproductive in some cases because they must be drilled through large areas of well-conducting aluminum. Thermal insulation is insufficient in such cases, and the aluminum cladding alone may suffice. IMS PCBs without thermal vias may be more efficient in this regard because heat is transferred by the aluminum within the carrier. It could even be more efficient than FR4 PCBs.

The thermal management properties of an IMS PCB are one of its most common advantages. A thermally conductive base metal, for example, is a good thermal conductor, reducing the amount of heat that must be transferred. The manufacturer will design and manufacture the board in accordance with these guidelines, and using a standard thickness can help to reduce costs. It is critical, however, to ensure that the material used for the base metal is thermally conductive in order to avoid excessive heat buildup.

Copper, aluminum, and other metals are commonly used to make IMS PCBs. Because of its excellent thermal and electrical properties, copper is frequently used in IMS PCBs. Aluminum is the most common metal substrate and is significantly less expensive than copper. Aluminum is also electrically and thermally conductive, making it an excellent choice for a wide range of applications. However, keep in mind that aluminum is much less resistant to corrosion.

The Advantages of IMS PCBs

When considering the advantages of IMS PCBs, it is useful to understand what distinguishes them from standard boards. A single copper layer is present on a single-layer PCB. On the other side, they are insulated by a metal substrate that also serves as a heatsink. However, if a circuit requires two copper layers, more complex circuits can be integrated. IMS PCBs also include heat transferring vias, which allow heat to be transferred from the top-side components to the bottom-side substrate.

It is critical to consider both the physical and electrical properties of IMS PCBs when using them. The dielectric constant, for example, is used to measure the electrical properties of an IMS PCB by comparing the capacitance of the metal substrate to that of the vacuum. The rate at which the metal substrate changes along the z-axis is another important parameter known as the thermal expansion coefficient. Finally, another important feature is the temperature at which the material transitions to a glass state and decomposition, which determines the material’s heat resistance.

IMS PCBs is constructed from several layers of thermally conductive dielectrics. The circuitry is buried in one or more dielectric layers that serve as thermal and signal vias. Multilayer printed circuit boards are more expensive than single-layer printed circuit boards, but they provide simple heat dissipation for complex circuits. They are an excellent choice for high-end PCs.

Applications of IMS Boards

Because they keep surface-mount components cool, IMS Boards are ideal. The electrical and mechanical properties of IMS PCBs must be thoroughly examined, and the copper thickness must be 0.5 oz. The benefits of the metal substrate and thermal conductivity are completely negated by thick copper. To create the holes for the components, the board must be precisely drilled. The components are then soldered or bonded to the copper surface. Desmearing is required after drilling to remove any melted resin from the drilled holes.

what is IMS PCB

A motherboard and two IMS evaluation modules, which can be configured as a full or half-bridge, comprise the IMS evaluation platform. The evaluation modules support both power levels and include GaN E-HEMTs, gate drivers, DC bus decoupling capacitors, and a heatsink. The evaluation modules can be used to prototype high-power GaN intelligent power modules and in-systems. The board is also intended for high-power applications, making use of vertical space.

Hundreds of control units in modern cars are located around the engine area and are subject to extreme temperatures. Because they can transport heat without the use of discrete heatsinks, industrial IMS PCBs are the ideal solution for applications like this. Solid-state relays, which are small circuits made up of an optocoupler and a MOSFET, are an excellent example of how IMS PCBs are used to transfer heat.

IMS PCBs is also well-known for providing effective thermal dissipation. They can reduce power losses and improve overall product performance because they can be made of thin copper sheets. This allows for higher packing densities on the board, improved overall security, and longer operating times. It is also suitable for use in single-board computers. This simplifies the production of double-sided boards with metal cores.

High-power IMS printed circuit boards are ideal for high-power, high-temperature, and combustible environments. IMS PCBs also serves as an electromagnetic shield and a ground layer. Because of these benefits, IMS PCBs is a popular choice for a variety of applications, including power electronics, solid-state relays, and LEDs. IMS PCBs also enables more compact designs that are less prone to catching fire.

IMS PCBs is more expensive than FR4 PCBs, despite their superior thermal conductivity. Copper-based PCBs have more layers than FR4 PCBs, which can also have multiple layers. PCBs of various thicknesses can be produced using standard machinery. Copper-based boards, on the other hand, are more expensive than their counterparts and have inferior thermal and electrical properties.

Ultrasonic Pretreatment in Anaerobic Digestion of Sewage Sludge

Anaerobic digestion process comprises of four major steps – hydrolysis, acidogenesis, acetogenesis and methanogenesis. The biological hydrolysis is the rate limiting step and pretreatment of sludge by chemical, mechanical or thermal disintegration can improve the anaerobic digestion process. Ultrasonic disintegration is a method for breakup of microbial cells to extract intracellular material.

Ultrasound activated sludge disintegration could positively affect anaerobic digestion of sewage sludge. Due to sludge disintegration, organic compounds are transferred from the sludge solids into the aqueous phase resulting in an enhanced biodegradability. Therefore disintegration of sewage sludge is a promising method to enhance anaerobic digestion rates and lead to reduce the volume of sludge digesters.

The addition of disintegrated surplus activated sludge and/or foam to the process of sludge anaerobic digestion can lead to markedly better effects of sludge handling at wastewater treatment plants. In the case of disintegrated activated sludge and/or foam addition to the process of anaerobic digestion it is possible to achieve an even twice a higher production of biogas. Here are few examples:

STP Bad Bramstedt, Germany (4.49 MGD)

  • First fundamental study on pilot scale by Technical University of Hamburg-Harburg, 3 years, 1997 – 1999
  • reduction in digestion time from 20 to 4 days without losses in degradation efficiency
  • increase in biogas production by a factor of 4
  • reduction of digested sludge mass of 25%

STP Ahrensburg, Germany (2.64 MGD)

  • Preliminary test on pilot-scale by Technical University of Hamburg-Harburg, 6 months, 1999
  • increase in VS destruction of 20%
  • increase in biogas production of 20%

STP Bamberg, Germany (12.15 MGD)

  • Preliminary full-scale test, 4 months, 2002 2) Full-scale installation since June 2004
  • increase in VS destruction of 30%
  • increase in biogas production of 30%
  • avoided the construction of a new anaerobic digester

STP Freising, Germany (6.87 MGD)

  • Fundamental full-scale study by University of Armed Forces, Munich, 4 months, 2003
  • increase in biogas production of 15%
  • improved sludge dewatering of 10%

STP Meldorf, Germany (1.06 MGD)

  • Preliminary full-scale test, 3 months, 2004 2) Full-scale installation since December 2004
  • increase in VS destruction of 25%
  • increase in biogas production of 25%
  • no foam or filamentous organisms present in the anaerobic sludge digester

STP Ergolz 2, Switzerland (3.43 MGD)

  • Full-scale test, 3 months, 2004
  • increase in VS destruction of 15%
  • increase in biogas production of 25%

STP Beverungen, Germany (2.64 MGD)

  • Full-scale test, 3 months, 2004/2005
  • increase in VS destruction of 25%
  • increase in biogas production of 25%

To sum up, ultrasonication has a positive effect on sludge solubilisation, sludge volume, biogas production, flock size reduction and cells lyses. Ultrasonic pretreatment enhances the subsequent anaerobic digestion resulting in a better degradation of volatile solids and an increased production of biogas.

The use of low power ultrasound in bioreactors may present a significant improvement in cost reduction. Therefore, ultrasonic pretreatment enhances the subsequent anaerobic digestion of sewage sludge resulting in a better sludge digestion and efficient recovery of valuables.

Methods for Hydrogen Sulphide Removal from Biogas

The major contaminant in biogas is H2S which is both poisonous and corrosive, and causes significant damage to piping, equipment and instrumentation. The concentration of various components of biogas has an impact on its ultimate end use. While boilers can withstand concentrations of H2S up to 1000 ppm, and relatively low pressures, internal combustion engines operate best when H2S is maintained below 100 ppm.

The common methods for hydrogen sulphide removal from biogas are internal to the anaerobic digestion process – air/oxygen dosing to digester biogas and iron chloride dosing to digester slurry.

Biological Desulphurization

Biological desulphurization of biogas can be performed by using micro-organisms. Most of the sulphide oxidising micro-organisms belong to the family of Thiobacillus. For the microbiological oxidation of sulphide it is essential to add stoichiometric amounts of oxygen to the biogas. Depending on the concentration of hydrogen sulphide this corresponds to 2 to 6 % air in biogas.

biogas-desulphurization

The simplest method of desulphurization is the addition of oxygen or air directly into the digester or in a storage tank serving at the same time as gas holder. Thiobacilli are ubiquitous and thus systems do not require inoculation. They grow on the surface of the digestate, which offers the necessary micro-aerophilic surface and at the same time the necessary nutrients. They form yellow clusters of sulphur. Depending on the temperature, the reaction time, the amount and place of the air added the hydrogen sulphide concentration can be reduced by 95 % to less than 50 ppm.

Biogas Bus

Measures of safety have to be taken to avoid overdosing of air in case of pump failures. Biogas in air is explosive in the range of 6 to 12 %, depending on the methane content). In steel digesters without rust protection there is a small risk of corrosion at the gas/liquid interface.

Iron Chloride Dosing

Iron chloride can be fed directly to the digester slurry or to the feed substrate in a pre-storage tank. Iron chloride then reacts with produced hydrogen sulphide and form iron sulphide salt (particles). This method is extremely effective in reducing high hydrogen sulphide levels but less effective in attaining a low and stable level of hydrogen sulphide in the range of vehicle fuel demands.

In this respect the method with iron chloride dosing to digester slurry can only be regarded as a partial removal process in order to avoid corrosion in the rest of the upgrading process equipment. The method need to be complemented with a final removal down to about 10 ppm.

The investment cost for such a H2S removal process is limited since the only investment needed is a storage tank for iron chloride solution and a dosing pump. On the other hand the operational cost will be high due to the prime cost for iron chloride.

The Function of Central Heating Radiators

Regular furnace tune-ups and maintenance just before the cold weather will help maintain your furnace and your HVAC system at top condition during the winter months. There are some common tips you can follow that will help ensure your furnace runs at peak efficiency through the long cold winter months:

heating-radiator

Help ensure your furnace runs

It is suggested that all of your HVAC equipment be cleaned and maintained before winter arrives. Beginning in early fall, have all of your cooling and heating equipment checked over thoroughly. Have a professional come out and check the furnace’s blower and ducts as well. In addition to ensuring that these are running smoothly, this will also help to prevent an increase in your home’s utility bills. If there is a problem in any of these components, you’ll need to replace them before winter fully sets in.

Finally, once your furnace has been turned back on, you’ll need to check your heat exchanger and duct for leaks. If the duct is leaking, then you may need to call a professional to take care of the leak or replace it with new ductwork. If your heater is not properly vented, then there’s a good chance that mold is growing behind the burner or behind the ductwork. You may actually be causing a foul smell from your furnace. Instead of calling a furnace service technician to come out and make you a furnace filter replacement, why not do it yourself?

First, get a flashlight and inspect your furnace’s ducts for blockages or clogs. A regular flashlight with disinfectant should work just fine. Take note of any spots that seem unusual where the air flows through. The spot could be a filter or the blower, depending on which system the furnace uses. If you see any areas with a thick black stain or smell, that’s a good indicator to clean or change the filter.

Getting furnace repairs

Once the furnace is checked and cleaned, you should conduct furnace service at least once a year. If you think you can’t do it yourself, call a reputable company in your area to get the job done. The costs for getting furnace repairs will vary depending on the make and model of your furnace and even the age of it. If you have an older model, you will probably spend more money than if you have a newer one. There are different ways to save on furnace service costs, so make sure to ask a professional about any suggestions you might have.

Remember that the experts say it is important to have regular maintenance on your furnace. However, this is not something you should take for granted. It is important to remember that the malfunctioning of your furnace could be due to the fact that there is a dirty duct where the oil or air gap gets filled up and causes the furnace to work hard to push out the air. In this case, hiring the services of a skilled and experienced furnace repairman in Calgary is essential so you don’t have to worry too much about the furnace’s condition.

If the problem with the burner is due to the presence of mold and mildew on the exterior portion of the heat exchanger, you can safely clean it yourself using a disinfectant spray made of chlorine and water. The spray must be used carefully so as not to damage the internal components of the heat exchanger and the burner. You should wear protective gloves so that you don’t spray the chemicals directly into the eyes. You can spray the area in a circular motion to avoid leaving streaks. This may also help in keeping the lining of the heat exchanger clear and free from dust, which is a common cause of friction.

Cleaning of heat exchangers by furnace service technicians is often recommended by manufacturers as an additional measure to prevent loss of refrigerant gas and to keep temperatures constant. A clean line allows for easier access when maintenance is necessary and prevents potential damage to the heating system itself. The cleaning process can take place during the summer, at night, or on days when there is little else that should be done.

Central heating radiators are available in a wide variety of styles to match any decor and to meet any budget. Whether a radiator is new or old, its function should be the first thing to be considered before buying. The more that the space heated by the radiator is heated by electricity, the more efficient the unit will be. Radiators will also heat the entire room, which could be a major plus depending on your budget.

4 Simple Furnace Repair Tips

Experienced HVAC repair technicians perform furnace repair and maintenance services. They have years of experience repairing high-end furnaces, including both wood-and hybrid models. Whether you’re having trouble with your boiler or other heating device, it’s best to contact an experienced technician. They will be able to diagnose the issue, offer the most effective solution, and fix your furnace in less time than it would take you to replace it. With trained furnace repair professionals by your side, you can feel confident that they will do their best to make your heating unit run as efficiently as possible.

furnace-repair-professionals

There are several things to look out for when trying to repair your heating system. Here are the simple tips for furnace repair:

1. Proper Certifications

One of the first steps is making sure the technician has the proper certifications. In order to qualify, he must fulfill HVAC National Board Certified Qualifying Board (HVAC NSB) qualifications. As part of being certified, he must also complete a comprehensive heat installation training program and pass the state exam. When checking out prospective technicians, make sure to ask what certifications they hold and how long they’ve been doing this type of work.

2. The Right Equipment

Next, it’s important to check out the technician’s equipment. Since many HVAC services perform work using heaters, it’s important to find out what kind of equipment they’re using. Ask to see their gas tank to see if the gas is topped off. If so, it’s a good idea to wait a few hours while the technician tops off the gas. Leaving the gas in for too long can cause serious problems like leaks and possibly explosions. If you notice signs of wear or damage on the heating equipment, contact the gas company immediately.

If the furnace repair is running but not producing enough heat, there are several steps you can take to troubleshoot the issue. First, turn the power to the furnace on and check to make sure it’s actually functioning. If it’s not, then the next step is to open the furnace door safety switch. This is located directly above the furnace itself. You’ll need to unscrew the two screws that are holding it in place and pull the safety switch straight down. It’s important to note that this step doesn’t require any tools and will allow you to safely open the door.

3. Check the Filters

Next, if you find that the furnace filters are clogged, these are the repairs you’ll need to do. Remove the filter from the furnace and wipe it clean with a damp cloth. If it appears to be damaged or dirty, you may need to purchase new filters. If not, simply replace the ones you’ve removed and wipe the rest of them clean with another cloth.

4. Cool off the Blower

For the last step in furnace blower repairs, you’ll need to remove the blower and place it in an open space to allow it to cool off completely. This step is particularly important if your heating system hasn’t been running for a while and you’re afraid of overheating it again. Once the blower has cooled down completely, it can be removed from the system. Again, you’ll need to perform all of these steps one at a time in order to ensure you don’t skip any of the necessary parts.

5. Tackling Gas Leaks

One more furnace repair tip involves cleaning and repairing gas leaks and defective heat exchangers. These are especially common in older heat and air-conditioning equipment, often resulting from poorly maintained duct work and outdated insulation. Blocked ducts allow cold air to freely enter the furnace room, which then warms up the interior of the room. Warm air can create a drafty environment inside the house, causing expensive energy bills to go through the roof.

Blocked ducts are also known to cause hot spots, especially in areas where there’s not enough duct work in the house. These hot spots will typically show up as small bluish-green stains in ceilings, walls, doors, and windows.

To fix hot spots and prevent drafty drafts, you can perform a filter change on your furnaces. It’s important to note that filters should only be changed with a qualified technician, as filters can be dangerous if changed by an untrained consumer. Filters should be replaced every three to six months, depending on the size of the filter, but they should always be replaced before they become blocked with dust or grime. Furnace repair professionals can perform the proper filter change for your furnaces and can guarantee that the process is done right.

Conveyor Systems for Waste Management

Conveyor systems are an integral component of waste management and recycling operations. It works for various types of materials and transports them to different locations.  They play a vital role in the process of sorting waste material and their movements.  Mixed wastes are arranged for inspection over a conveyor, which then moves it from one end to another. While on its way items are sorted and unwanted materials are removed.

Conveyors are also used for carrying recycling materials such as wood or paper wastes to their respective grinding and process centers. Waste conveyors are manufactured with materials that do not get damaged by constant exposure to abrasives. They are also not affected by sticky or greasy liquids and dirt. Belt conveyors and chain conveyors are the most commonly used conveyors in recycling plants.

material-recovery-facility

Mostly non-powered conveyors are used in the industry. However, powered belt and roller conveyors are sometimes used for handling small products. They are typically used for pallet handling.

Conveyors are also used for moving waste materials in long streams so that they can be separated. Vibrating belts are attached which separate materials that require inspection. Waste materials and recycling industry is mostly about dealing with contaminated products and trash. Thus additional cautions are considered for the safety and environmental standards of the workers.

Types of Conveyors

Conveyors vary in shapes and dimensions according to their utility. From being installed in biomass plants, waste sorting plants, material recovery facilities, waste-to-energy plants, to being a prime component at food processing facilities, paper industry, mining, and pharmaceutics, conveyors are used everywhere.

Even at tough job-sites where transfer of materials is required across steep inclinations or large distances conveyors can ease the process. Generally, they are classified as belt conveyors and screw conveyors.

Waste_Conveyor

Screw Conveyors

Screw conveyors were invented by Archimedes and its core design hasn’t changed from its original design over these years. They can be vertical or horizontal with an entirely contained, metered space. Screw conveyors are generally used for moving dust-free movement of grains or flakes, powders, sludge, etc. They are made of galvanized metal, carbon steel, stainless steel, tapered screws, discharge chute, or in-feed hoppers.

Belt Conveyors

Belt conveyors have a wide-open frame which enables them to contain and move high loads of material over long distances. This is why they are commonly used in the mining industry and other places where heavy materials are required to be transported.  Structurally they are rugged loops that run over two or more pulleys. Additional rolls are also added in between to provide support in long belts.

Materials ranging from garbage to fine grains and powders and be carried over belt conveyors. They are also used for the movement of commercial waste including paper, plastic, or aluminum cans.

Belt material, configuration, and dimension differ according to its application. Various designs of belts are used nowadays, for example, magnetic belts, flat belts, trough belts, rubber belts, etc. Moreover, conveyors are also designed in shapes such as to carry fluids including sludge and water. Key manufacturing materials for these belts are cotton, canvas, leather, nylon, polyester, silicone, and steel. Dimension, design and materials can be easily customized depending on its application and to meet customer requirements.

Dyne Testing and its Usefulness

Dyne Testing is a technology, a method to measure surface wettability. The low surface wettability of polymer-based substrates is the sign of poor adhesion of inks, glues and coatings. Thus, to obtain the optimum amount of adhesive it is necessary to increase the surface energy of the substrate which can be done by surface treatment with either Corona or Plasma. It will result in good wetting of the material over the surface of the substrate and hence, it improves adhesion.

For the optimum adhesion, while printing, gluing, or coating the various substrates, it is necessary to obtain high surface energy which can be obtained by Dyne Testing Markers. The fluid that is present in the Dyne Testing markers is based on ISO 8296 method for measuring the surface energy of polythene film.

When the Dyne Testing Pens are being applied to the surface, the liquid will form a continues film or will form a small trail of droplets. If it is being stretched as a film for at least 3 seconds, the substrate will have a minimum surface energy of that ink value which will be expressed in mN/m (Dynes).

The exact surface energy (Dyne level) can be determined by applying a range of increasing or decreasing values of Dyne test pens thereby taking the steps to improve its condition.

The Dyne Test Pen may lose its accuracy for which there are 3 reasons:

  1. It could get contaminated with the foreign substance
  2. It could evaporate quicker than it is expected to be
  3. And the third reason is ageing, during which chemical reactions take place among the constituents.

The experts have also faced the problem with the ageing of Dyne Testing Equipment. If their hue or color density are almost past their expiration date, it is advisable to replace them as stated by experts. The lower Dyne value states that the value stated on the bottle does not match true surface tension. You must be sure that retains the substrate used for the measurements are to be kept well sealed, free from contamination, and stored under laboratory conditions.

The ideal Dyne Testing Pen should be:

  • easy to handle,
  • perfect for the quick spot checks on the production floor,
  • very easy to read,
  • no subjectivity for this type of test,
  • no wiping off necessary,
  • lasting display of result, and
  • very striking coloring.

Conclusion

The Dyne Testing Kit is based on valve tip applicator and not the magic marker type. The quick test 38 pen is our most popular product amongst all and it is available in a bright red ink. This is the quick test pen which serves to check the surface treatment of all plastic substrates.

It has a shown an effect onto the material such that a stroke of the pens leaves a full line on the material if the material’s surface energy is below 38 Dynes/cm. Also, as mentioned above if the materials surface energy is below 38 Dynes/cm, the fluid will form small drops on the surface. The fluid applied to the surface will dry within seconds; it does not need to be wiped off anymore.

The Common Types of Electrical Wires Used in Homes

Starting first and foremost, we know that the technological advancements of this modern society have completely revolutionized the whole world and have turned it into a global village. The technological wonders have completely transformed life from each and every perspective. People have been continuously trying to adapt themselves to the new ways of living as their lives have constantly been molded by the different ongoing trends. So, to keep pace with this fast-growing world, people have been striving to understand the generic and basic concepts of the technological revolution.

The primary reason behind this is that technological application has brought a drastic degree of ease to our lives. Even the slightest, most minor and monotonous routine tasks started to include the usage of different technological wonders. The most common example could be smart devices. Some of the most common facilities brought by technological advancement include the online shopping experience, online banking transactions, online bill payments and many more.

All of these have made life significantly more accessible than the way it was before, which evidently and concretely explains how technology embedded its roots into this world.  

types of wires used in homes

Common Types of Electrical Wire

Now sticking to the main course that revolves around our houses and common types of electrical wires used in our houses, although nowadays artificial intelligence is making further ways into our lives as some people prefer to install the electronic door and windows that tend to open with a voice command. Besides that, google security system is also quite a common thing nowadays.

But let us explore the very common types of electrical wires used in homes. All of them still hold significant importance because of their iconic and exquisite functionalities in the wiring of homes and buildings. So, the following are the most common types of electrical wires used in homes:

  • Armored Cable
  • Feeder Cable
  • Low voltage cables
  • Phone and data wire
  • NM cable

To have a good concept regarding each of their respective roles, let us shed some light on the different and versatile aspects of these common types of electrical wire used in homes one by one. This will help us understand even the underlying minor details, ultimately yielding a better understanding of the overall concepts, ideas, roles and last but not the most minor basic functionalities of these electric cables.

1. Armoured Cable

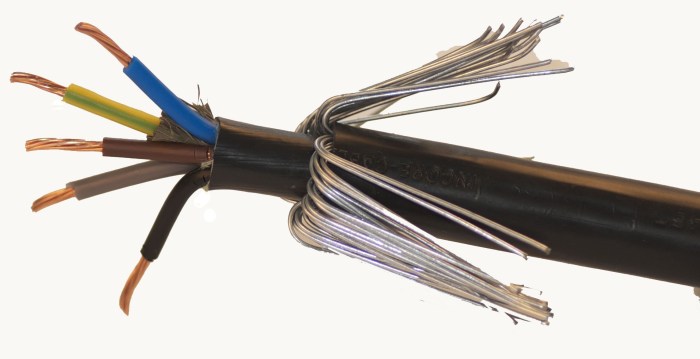
Whenever the topic of discussion revolves around the common wires to be used in the house wiring systems, armoured cables tend to pop up in one’s mind immediately. Typically, armoured cables tend to contain an earthed metal sheet that enables them to act as an excellent protective conductor. They are commonly used for underground installation procedures.

Armoured cables also play a role in different exceptional situations where the wiring has to be done in tight underground spaces or through a tunnel-like structure. They are highly cost-effective as after using them, there is no need to install anything to protect the system. Along with that, their installation comprises simple procedures and is also time-efficient.

2. Feeder Cable

Feeder cable is specifically designed for some particular functionalities that tend to involve the installation in wet places or different areas with a higher possibility of rain. These cables are buried directly underground. They can also be used to wiring the primary circuits as they contain plastic sheathing and a grey sheathing at the outer surface.

Ways to Make Your Business More Eco-Friendly

3. Low Voltage Cable

The name clearly indicates that these cables are designed explicitly for circuits with a typically low voltage limit of up to 50 V. They are mainly used for the wirings in thermostats, doorbells and sprinkler systems which do not require much electricity.

4. Phone and Data Wire

The phones and data that refer to the internet connection have become the utter necessity of our lives. As highlighted in the introduction, our lives have become dependent on technology. So, these wires are used for the phone and data connection. Although these wires contain low voltage, it is specifically recommended to be precautious while operating them. One should not be negligent in touching a bare wire.


5. NM Cable

This cable is generically used at dry places specifically for indoor home wirings, primarily including various appliances, switches, etc. This cable has a flexible plastic jacket referred to as a wrapped sheathing possessing three individual conductors inside it.

So, these are the most commonly used types of electric wire. When it comes to manufacturing them, zwcables.com have been remarkable excellent in providing their customers with high quality and a wide variety of electric wires. They have been living up to their reputation as they are considered brilliant when it comes to manufacturing these common types of electrical wire used in homes and many others.

How Does The Eddy Current Conductivity Meter Works?

The Eddy Current Conductivity Meter measures the conductivity of a solution. It measures the flow of ions in a solution. It works by measuring the change in the amount of electric current flowing through the liquid when a voltage is applied to the electrodes. The meter works by having a conductive liquid and a reference electrode.

The reference electrode is placed in contact with a pure water source. Then, when a specific solution is tested, the electrodes are connected to the liquid, and the liquid is between the two electrodes. This creates an electric field, which attracts ions from the liquid to the electrode. The liquid’s conductivity is the amount of current flowing through it.

This article will tell everything you need to know about the Eddy Current Conductivity Meter.

How Does The Eddy Current Conductivity Meter Works

What is Eddy Current Conductivity Meter?

The eddy current conductivity meter measures the conductivity of a solution by measuring the alternating magnetic field generated by the solution. As a solution flows through the meter, it generates an alternating magnetic field measured by the meter.

The meter readings are directly proportional to the conductivity of the solution. This makes it an accurate method of determining the conductivity of a solution.

Emitting an alternating magnetic field is the simplest way of measuring the electric current concentration in a solution. The current induces a change in the sensor’s magnetic field, which is measured and recorded.

Eddy current conductivity meters use electric current to determine the concentration of a mineral, solution, or another conductive material in the solution.

These devices are also helpful in automobiles to test the transmission of signals, resulting in a checked engine. In the electrical safety analysis, these trackers help in verifying the wearing connections on the primary power supply.

Eddy current meter is vastly used for fundamental research like in mass spectrometry, magnetic fields, and impedance spectrometry and to measure rare earth elements which happen to be observed in very dilute quantities within the water.

The meter can give readings between 0 and 600 micro siemens per centimeter (μS/cm) depending on the solution. It is used in mining, drilling, oil and gas, and chemical and food processing industries.

If you have a background in chemistry and have always wanted to learn more about the practical applications of chemistry, this article is for you.

How Does The Eddy Current Conductivity Meter Works?

The Eddy Current Conductivity Meter works by using the principle of eddy currents. The EDC conductivity meter uses a probe to measure the material’s conductivity upon contact.

The user must insert the probe into the material. Low-conductive materials and non-metallic such as glass, ceramics, rubber, and galvanized metal can not be measured by this device. The instrument’s dual-frequency inverter upsets the sample underneath by ionizing water molecules. In some materials, there are fewer ions than in other materials.

These minimal accumulations will result in measuring inconsistency concerning metals. Glass jar would not respond appropriately in this regard, thereby making it unknown as to its conductivity above all else.

The instrument has several pre-programmed tested combinations that effectively readout of the material’s response fused with internal current sensors.

Differential amplification between those two controllers leads to differences in measured properties within those conditions where similar-sized cuvettes were used for eddy current determination against each other.

To attain accurate results, spectrum analyzers should be used and correlated with data before discarding as erroneous measurements have been made in either system errors or instrumental contamination.

Conclusion

Through this piece, you could read up on the eddy current conductivity meter. The benefits are that it’s easy to read, it cuts down on the labor of doing things by hand, and how to use of the test area could be impaired in working conditions where there is limited light due to dust or poor ventilation.